24/02/2019
House Model Continued
Today saw the final editions to the house model before continuing onto the UV process and then texturing to begin. However, before the final editions could be added, a resolution needed to be found for the stretching of faces for the window assets when rotated. A search on YouTube ensued, looking through different videos which might have the answers to resolve this problem. Initial thoughts, were that the faces might have been doubled, however, this proved not to be the case. Suggestions from the advised that the faces needed to be reversed. However, this proved not be the answer either. Another possibility could be that the axis rotation needed changing on the model, from world to object or component. This proved not to be the case either. One of the course tutors, Mathew Dodd, suggested that it could be that constraint option required turning off. Taking this option as a possibility and looking at YouTube videos, https://www.youtube.com/watch?v=CfJ1cvtz5d4, (Wilson, 2016). The first video advising switching off the constraint option did not change or fix the problem regarding the stretching when rotating. https://www.youtube.com/watch?v=ZMYfdNM4mgo, (Truong CG Artist, 2018), advised fixing double faces by selecting all vertex at once and merging them at a certain radius so not to damage the model, but to eliminate the double faces. However this also proved not to be the problem. The final YouTube video had the resolution to the problem. https://www.youtube.com/watch?v=RxDkWnn6_Ao, (3D Artcore, 2013). The video advised moving the selected problematic asset and then in the outliner moving and placing the item above the group, as seen in figure 127.
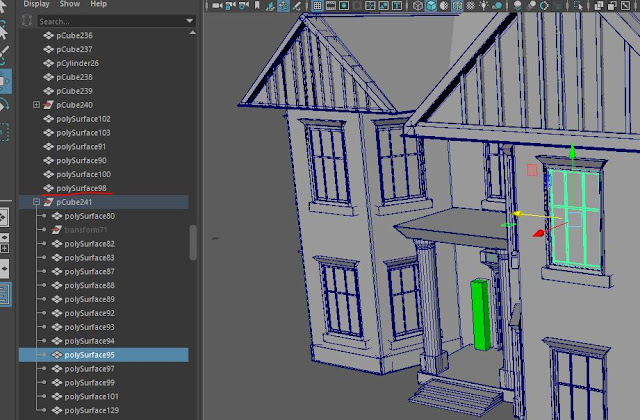
Fig 127 - Resolution.
This worked. As a result, the item was able to rotate properly without any problems such as stretching. This now allowed the assets to be duplicated around the house model into place, based off architectural design from the 19th century in the Georgian and Victorian periods, as well as agreed placements with Connor Burdett for the interior window placements, as seen in figures 128-133.
 Fig 128 - House.
 Fig 129 - House.
 Fig 130 - House.
 Fig 131 - House.
 Fig 132 - House.
 Fig 133 - House.
One change was made to the one of the side windows near the chimney. This window is designed to be smaller than the rest due to it being a first floor hallway window that will play a significant part in the game as spoken about in Connor Burdett's section for the interior of the house. The window is designed to be small to give very little light coming into a dark hallway whilst the character proceeds around the interior of the house, giving an suspense to the game play, inspired by Resident Evil, Biohazard. (Capcom, 2018). This can be seen in figure 134.

Fig 134 - Small Window.
More assets were created in the form of the outer wall, steel railings and gate. These were based off images gathered in mood boards on Pinterest.
 Fig 135 - Fencing and Gates Mood board. https://www.pinterest.co.uk/stewartmarr/fencing-and-gates/.
 Fig 136 - Wall. https://www.pinterest.co.uk/stewartmarr/fencing-and-gates/.
 Fig 137 - Gates. https://www.pinterest.co.uk/stewartmarr/fencing-and-gates/.
 Fig 138 - Wall. https://www.pinterest.co.uk/stewartmarr/fencing-and-gates/.
 Fig 139 - Gates. https://www.pinterest.co.uk/stewartmarr/fencing-and-gates/.
 Fig 140 - Gates. https://www.pinterest.co.uk/stewartmarr/fencing-and-gates/.
 Fig 141 - Wall. https://www.pinterest.co.uk/stewartmarr/fencing-and-gates/.
 Fig 142 - Gates. https://www.pinterest.co.uk/stewartmarr/fencing-and-gates/.
A design was chosen similar to that from figures 136 and 138 for the main wall design. Whilst for the gates, a design based on figures 137 and 142. This was done taking a cube and extruding edges out and up to give the defined shape. A cube was also added to the base of the fence to represent the concrete. Cylinders were used as railings and a cone for the spike on the top of the railings. A video was also watched for ideas in how to create and define the cone shape into a spike, matching the spikes seen in figure 141, https://www.youtube.com/watch?v=R5d1UZfMWc8 , (Arrimus 3D, 2017). The fencing has been designed to modular, to add pieces when required. Gates were created in the same, using the railings and spikes from the fences to create the gates. The last touch was adding small boxes and a downsized front handle to be used on the gates as the gate handles. The small boxes were then used as hinges for the gates next to the fence.
 Fig 143 - Spike.
 Fig 144 - Gates.
 Fig 145 - Wall.

Fig 146 - Gate Hinges.
In preparation for creating more assets, more mood boards were created through Pinterest in order to gather design ideas. Mood boards for the design of the axe, shed, roads and mine shaft were assembled.

Fig 147 - Axe Mood board. https://www.pinterest.co.uk/stewartmarr/axe/ .

Fig 148 - Mine shaft Mood board. https://www.pinterest.co.uk/stewartmarr/mineshaft/.
 Fig 149 - Shed Mood board. https://www.pinterest.co.uk/stewartmarr/shed/.

Fig 150 - Roads Mood board. https://www.pinterest.co.uk/stewartmarr/roads/.
The mood boards have been assembled in preparation for the creation of these assets. It will be put forward in the next group meeting about design features and choice for the axe, shed and mine shaft, in terms for what the group envisage these assets should look like.
House Model Continued
Today saw the final editions to the house model before continuing onto the UV process and then texturing to begin. However, before the final editions could be added, a resolution needed to be found for the stretching of faces for the window assets when rotated. A search on YouTube ensued, looking through different videos which might have the answers to resolve this problem. Initial thoughts, were that the faces might have been doubled, however, this proved not to be the case. Suggestions from the advised that the faces needed to be reversed. However, this proved not be the answer either. Another possibility could be that the axis rotation needed changing on the model, from world to object or component. This proved not to be the case either. One of the course tutors, Mathew Dodd, suggested that it could be that constraint option required turning off. Taking this option as a possibility and looking at YouTube videos, https://www.youtube.com/watch?v=CfJ1cvtz5d4, (Wilson, 2016). The first video advising switching off the constraint option did not change or fix the problem regarding the stretching when rotating. https://www.youtube.com/watch?v=ZMYfdNM4mgo, (Truong CG Artist, 2018), advised fixing double faces by selecting all vertex at once and merging them at a certain radius so not to damage the model, but to eliminate the double faces. However this also proved not to be the problem. The final YouTube video had the resolution to the problem. https://www.youtube.com/watch?v=RxDkWnn6_Ao, (3D Artcore, 2013). The video advised moving the selected problematic asset and then in the outliner moving and placing the item above the group, as seen in figure 127.
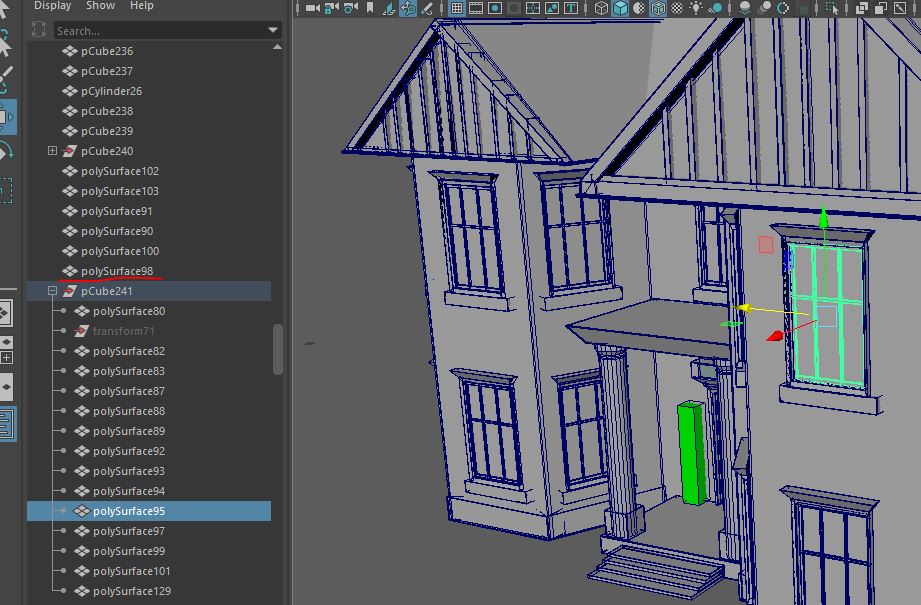
Fig 127 - Resolution.
This worked. As a result, the item was able to rotate properly without any problems such as stretching. This now allowed the assets to be duplicated around the house model into place, based off architectural design from the 19th century in the Georgian and Victorian periods, as well as agreed placements with Connor Burdett for the interior window placements, as seen in figures 128-133.


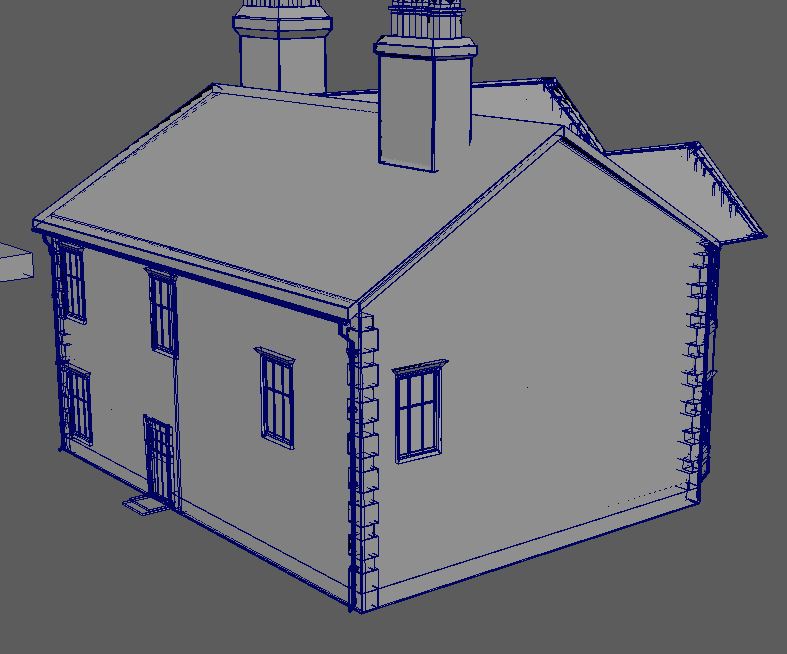


Fig 134 - Small Window.
More assets were created in the form of the outer wall, steel railings and gate. These were based off images gathered in mood boards on Pinterest.


A design was chosen similar to that from figures 136 and 138 for the main wall design. Whilst for the gates, a design based on figures 137 and 142. This was done taking a cube and extruding edges out and up to give the defined shape. A cube was also added to the base of the fence to represent the concrete. Cylinders were used as railings and a cone for the spike on the top of the railings. A video was also watched for ideas in how to create and define the cone shape into a spike, matching the spikes seen in figure 141, https://www.youtube.com/watch?v=R5d1UZfMWc8 , (Arrimus 3D, 2017). The fencing has been designed to modular, to add pieces when required. Gates were created in the same, using the railings and spikes from the fences to create the gates. The last touch was adding small boxes and a downsized front handle to be used on the gates as the gate handles. The small boxes were then used as hinges for the gates next to the fence.


Fig 146 - Gate Hinges.
In preparation for creating more assets, more mood boards were created through Pinterest in order to gather design ideas. Mood boards for the design of the axe, shed, roads and mine shaft were assembled.


Fig 148 - Mine shaft Mood board. https://www.pinterest.co.uk/stewartmarr/mineshaft/.


Fig 150 - Roads Mood board. https://www.pinterest.co.uk/stewartmarr/roads/.
The mood boards have been assembled in preparation for the creation of these assets. It will be put forward in the next group meeting about design features and choice for the axe, shed and mine shaft, in terms for what the group envisage these assets should look like.

Comments
Post a Comment