21/02/2019


Modelling Continued
Today involved adding further detail and last elements to the house model. The first element to be worked on was the chimney pots. Having already seen example of chimney pot design from the 19th century in figure 95, it was decided to keep to this design. The design is simple to create and research through Pinterest images would suggest it was a popular design fro the period, however, there it should also be noted,chimney pot design from this period is extensive and not subject to one design. Using a similar image from figure 95, some more images were added to the chimney mood board on Pinterest to be used a reference images for the chimney pot. The images used as reference images are in figure 97 and 98.

Fig 97 - Chimney Pot. https://www.pinterest.co.uk/stewartmarr/house-chimney-pots/ .

Fig 98 - Chimney Pot. https://www.pinterest.co.uk/stewartmarr/house-chimney-pots/
 Fig 99 - Chimney Pots.
The finished result can be seen in figure 99. This was created using edge loops and extruding edges out to create the desired architectural design. Further changes were made to the chimney itself. Inspired by the chimney pot creation, some detail was added to the edges by extruding faces out to match reference images in figure 100.
 Fig 100 - Chimney Design. https://www.pinterest.co.uk/stewartmarr/house-chimneys/.
The edited chimney now has now a slight lip created for it to match Georgian and Victorian architecture. See figure 101.
 Fig 101 - Chimney.
More changes were made to the drainpipe hopper to match those from reference images in figure 102 more accurately, as seen in figures 103 and 104.
 Fig 102 - Drainpipe Hopper. https://www.pinterest.co.uk/stewartmarr/house-guttering/
 Fig 103 - Drainpipe Hopper.
 Fig 104 - Drainpipe Hopper.
The next asset to be created for the house was the front door and door frame. Once again, using reference images gathered in mood boards on Pinterest, a design was settled on to match the the Georgian and Victorian architectural design, based off figures 105 and 106.
 Fig 105 - Front door. https://www.pinterest.co.uk/stewartmarr/house-doors/

Fig 106 - Front door. https://www.pinterest.co.uk/stewartmarr/house-doors/

Fig 107 - Front door.
The door and its frame were based on the design in figure 106 from Pinterest. This was done by using edge loops and extruding the panels inwards to create a similar design to that in figure 105 and 106. Further details were added such as a post box, door handle in the centre of the door, door knocker and key hole. The letter box and door handle were based on the reference image in figure 106. Both assets were created by taking a basic shape and adding edge loops and extruding inwards or outwards as required to match the reference images. The door knocker was created from three separate pieces, based off figure 106 and 108. The assets created form the reference images in figure 108 can be seen in figures 110 and 111.
 Fig 108 - Door Knocker. https://www.pinterest.co.uk/stewartmarr/house-doors/.
The key hole for the door was based off the reference image in figure 109. However, the keyhole may need to be adapted a later date, as can be seen in figure 112.
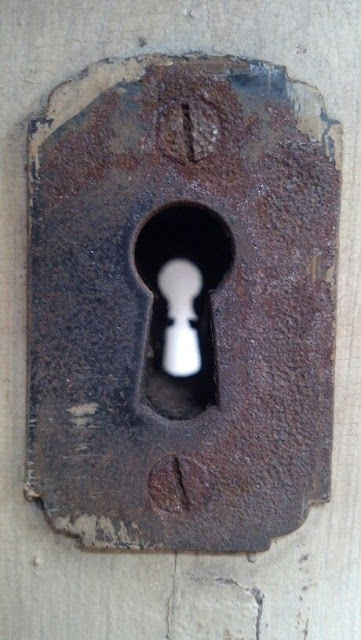 Fig 109 - Keyhole. https://www.pinterest.co.uk/stewartmarr/house-doors/.
 Fig 110 - Door Knocker.
 Fig 111 - Door Handle.
 Fig 112 - Keyhole.
The next asset to be created was the window and window frame. Based loosely off the front door, extra edge loops were added and the plane extruded backwards to create the glass simulation. The design was based off the reference image in figure 113. The result can be seen in figure 114.
 Fig 113 - Window. https://www.pinterest.co.uk/stewartmarr/house-windows/
 Fig 114 - Window.
The last asset created for the house was the rear door. A rear door needed creating as it would be a different style to the front door. As a result a mood board on Pinterest was put together to aide with the design process.
 Fig 115 - Rear Door Mood board. https://www.pinterest.co.uk/stewartmarr/rear-house-door/
It was then decided to create the rear door based from a reference image in figure 116.
 Fig 116- Rear Door. https://www.pinterest.co.uk/stewartmarr/rear-house-door/
 Fig 117 - Rear Door.
The creation of the rear door was similar to that of the front door and windows, using edge loops to cut across the face of a cube and extrude faces backward that represent the windows. Separate pieces were used to create the door handle, once again using a cube and shaping it accordingly to represent a door handle. The keyhole from the front door was duplicated and moved onto the back door. Cylinders were used as bolts. This was done by bevelling the edges to give a bolt shape. Other features that were added, were two steps from the front door to the rear and the door frame from the front with faces removed, to make the rear door less grand as the front entrance. This can be seen in the difference in design from figures 105, 106 and 116.
As a result of today's work the asset list has been updated with dates of completion added to the asset list.
 Fig 118 - Asset List.
https://docs.google.com/spreadsheets/d/1YrUs23Byj6R25quzYMl1hl6o7ADmAgKjf1Y58AHxowY/edit#gid=0.
One problem that has occurred when duplicating the windows and the window frames, was when rotating the window and window frames to fit into position, the faces became stretched or squashed, as seen in figure 120 and 121. The reason for this is unknown at this time. First thoughts are possibly double faces. One suggestion from the group could be the faces need reversing. This was tried, however it did not resolve the problem with the assets.
 Fig 119 - Window.
 Fig 120 -Window.
 Fig 121 - Window.
Music
A update regarding the music compilation for the game was received from Dean. Previously Dean had sent the group a sample of the music created for the game. However, there were problems with the music file and the group were unable to open the file. Dean has since been in contact and will re-send the music file upon his return to University next week as Dean requires assistance with the file and software.

Fig 122 - Email.
Drainpipe Brackets
Further work was carried out to the model, creating drainpipe brackets and nails for holding the drainpipes in place.
Reference images taken around Liverpool city centre on a previous occasion being used to help create the drain pipe brackets for authenticity purposes.
 Fig 123 - Drainpipe. Slater Street.
 Fig 124 - Drainpipe. Slater Street.
 Fig 125 - Drainpipe. Slater Street.
 Fig 126 - Drainpipe.
These models will now be placed over the existing drainpipes on the model around the house.

The finished result can be seen in figure 99. This was created using edge loops and extruding edges out to create the desired architectural design. Further changes were made to the chimney itself. Inspired by the chimney pot creation, some detail was added to the edges by extruding faces out to match reference images in figure 100.

The edited chimney now has now a slight lip created for it to match Georgian and Victorian architecture. See figure 101.

More changes were made to the drainpipe hopper to match those from reference images in figure 102 more accurately, as seen in figures 103 and 104.


The next asset to be created for the house was the front door and door frame. Once again, using reference images gathered in mood boards on Pinterest, a design was settled on to match the the Georgian and Victorian architectural design, based off figures 105 and 106.


Fig 106 - Front door. https://www.pinterest.co.uk/stewartmarr/house-doors/

Fig 107 - Front door.
The door and its frame were based on the design in figure 106 from Pinterest. This was done by using edge loops and extruding the panels inwards to create a similar design to that in figure 105 and 106. Further details were added such as a post box, door handle in the centre of the door, door knocker and key hole. The letter box and door handle were based on the reference image in figure 106. Both assets were created by taking a basic shape and adding edge loops and extruding inwards or outwards as required to match the reference images. The door knocker was created from three separate pieces, based off figure 106 and 108. The assets created form the reference images in figure 108 can be seen in figures 110 and 111.

The key hole for the door was based off the reference image in figure 109. However, the keyhole may need to be adapted a later date, as can be seen in figure 112.


The next asset to be created was the window and window frame. Based loosely off the front door, extra edge loops were added and the plane extruded backwards to create the glass simulation. The design was based off the reference image in figure 113. The result can be seen in figure 114.


The last asset created for the house was the rear door. A rear door needed creating as it would be a different style to the front door. As a result a mood board on Pinterest was put together to aide with the design process.

It was then decided to create the rear door based from a reference image in figure 116.


The creation of the rear door was similar to that of the front door and windows, using edge loops to cut across the face of a cube and extrude faces backward that represent the windows. Separate pieces were used to create the door handle, once again using a cube and shaping it accordingly to represent a door handle. The keyhole from the front door was duplicated and moved onto the back door. Cylinders were used as bolts. This was done by bevelling the edges to give a bolt shape. Other features that were added, were two steps from the front door to the rear and the door frame from the front with faces removed, to make the rear door less grand as the front entrance. This can be seen in the difference in design from figures 105, 106 and 116.
As a result of today's work the asset list has been updated with dates of completion added to the asset list.

https://docs.google.com/spreadsheets/d/1YrUs23Byj6R25quzYMl1hl6o7ADmAgKjf1Y58AHxowY/edit#gid=0.
One problem that has occurred when duplicating the windows and the window frames, was when rotating the window and window frames to fit into position, the faces became stretched or squashed, as seen in figure 120 and 121. The reason for this is unknown at this time. First thoughts are possibly double faces. One suggestion from the group could be the faces need reversing. This was tried, however it did not resolve the problem with the assets.


Music
A update regarding the music compilation for the game was received from Dean. Previously Dean had sent the group a sample of the music created for the game. However, there were problems with the music file and the group were unable to open the file. Dean has since been in contact and will re-send the music file upon his return to University next week as Dean requires assistance with the file and software.

Fig 122 - Email.
Drainpipe Brackets
Further work was carried out to the model, creating drainpipe brackets and nails for holding the drainpipes in place.
Reference images taken around Liverpool city centre on a previous occasion being used to help create the drain pipe brackets for authenticity purposes.


These models will now be placed over the existing drainpipes on the model around the house.

Comments
Post a Comment